Showing posts with label Mexican Dinners. Show all posts

Saturday, June 16, 2012

Cilantro Lime Chicken Tacos... Crockpot Style!

Hey Y'all!

I have been in paper writing mode for a few days now! I am so tired of writing papers. I am almost to the point where I don't even want to see my computer any more! But, I figured a blog post WITH a recipe would cheer me up tremendously! I submitted all SEVEN projects that are due on Sunday last night. I also went ahead and completed one of the projects I have due next week. So I figure that gives me today and tomorrow off.. just in time to go and hang at the beach! I also think that it is a crying shame that Friday was national flip flop day, and I had school work to do. Whah, whah, whah!


In true JKP fashion, this recipe is TASTY, CROCKPOTISH and EASY to throw together!
To make Cilantro Lime Chicken Tacos you will need:


1 packet of Taco Seasoning
1 jar of 24 oz mild or medium salsa (your choice!)
The juice of 1 lime
1/4 cup chopped fresh cilantro. Oh, how I LOVE cilantro!
4 boneless chicken breasts

Combine the entire jar of salsa, taco seasoning, lime juice and the cilantro in a bowl. Mix well.


Place the chicken breasts in the bottom of the slow cooker. Pour the salsa, lime juice, cilantro, taco seasoning mixture over the chicken.


Cover and cook on low for 6 hours or on high for 3.

About 30 minutes before serving, remove the chicken from the crockpot. Shred into pieces. Place shredded chicken back into crock pot and mix well.

When ready, scoop chicken into taco shells and top with sour cream. DEVOUR.


p.s. You don't have to shred the chicken, you can serve the chicken breast whole, but I love adding it to a taco shell! You could also serve this in a tortilla bowl and make a salad out of it too!


Tootles!
:) JKP

Monday, January 23, 2012

Sopa del Taco (Taco Soup) - Crockpot Style

Hey Y'all!

For Christmas I bought myself a fantastic new cookbook. It is part of the "Fix It and Forget It" cookbook line. This was more of a magazine than a book, but it is jam packed with yummy recipes. This is one of them. Talk about easy. Talk about yummy.


To make Taco Soup you will need:


1 packet of Ranch Dressing mix
1 packet of Taco Seasoning mix
1 15 oz. can of  red kidney beans, undrained
1 15oz. can of black beans, undrained
1 15 oz can of corn, undrained  (I had white in my pantry, but you can use regular too!)
1 28 oz cans of CRUSHED tomatoes, undrained
1 small onion, chopped
1 pound of ground beef

Now. Stay tuned. This is hard.

Brown the beef. Drain fat and add to slow cooker. Combine all other ingredients. Do NOT drain any of the cans. Mix well. Cover and cook on low for 4 to 6 hours.


 Garnish with cilantro and sour cream if you would like to. I added some shredded cheddar cheese to mine. Enjoy. Yummy in your tummy!!!! This also freezes very well. I took it for lunch all last week!
This makes about 8 servings.

Happy Crockpotin'!
:0) JKP

Tuesday, October 11, 2011

Oh My Golly... Tamale Pie!

Hey Y'all!

Well, this is a long overdue cooking post! I have been so busy at school, that most of my nights have been spent knitting to get to my happy place! And... since the latest debit card debacle... AND NO my money has not been returned yet.. I am kind of saving my cash reserves, so I haven't made a trip to the store to cook up anything yummy this week. But, never fear.. I have plenty of recipes in reserve!

So let's get to it!
Today I bring you.. Oh My Golly... Black Bean Tamale Pie! And it is sooo easy.... and sooo good! Here's what you are going to need....

1/2 pound of ground beef
1/2 cup of chopped onion
1/2 cup chopped green pepper
1 can of black beans (rinsed and drained)
1 cup of salsa... I used a medium heat
1 package (8 1/2 ounces) corn bread/muffin mix. I went for the sweet stuff! I am not a fan of regular cornbread. I prefer it sweet! You can use what you prefer!
1/4 cup of milk
1 egg
2 cups of shredded cheddar cheese... divided
Go ahead and set your oven to 375 degrees.


Begin by cooking the beef, onion and green pepper over medium heat until the meat is no longer pink. Drain the fat. Stir in the black beans and salsa. Set this mixture aside. AND.. a funny thing happened to me when I opened my can of black beans. My beans were not black! They were red beans! Oh well. I used them any way. Although, I did think that I might end up on an episode of House. :)


Next, in a large bowl combine the muffin/cornbread mix, milk, egg and 1 cup of the shredded cheese. Pour this mixture into a greased 9 inch pie plate and bake at 375 degrees for 5 to 6 minutes.


Carefully spoon the beef mixture over the cornbread crust leaving about a 1/2 inch edge. Bake for 15 to 18 minutes until crust is golden brown. Sprinkle the remaining cup of cheese over the pie. Bake for 1 to 2 minutes longer until the cheese is melted. Serve with sour cream and enjoy a full belly! :)


Whew! Alrighty peeps. I am off to bed. I have early morning duty tomorrow, which means a 5:15 am wake up call for me and the PittyPadster. Don't forget... Brad Meltzer's Decoded has a new season and it is airing on Wednesday's at 10 pm on the History Channel. You need to watch this show!!! The conspiracy theorist in you WANTS to watch this show!

Tootles!
JKP

Sunday, July 10, 2011

Taquito Pizza!

Hey Y'all!

Well!! The Internet drama continues at my house! The crazy thing is that it works just FINE on the WEEKENDS! But when Monday morning rolls around... we are back to one hour of Internet equals three hours of no Internet. So, sadly I think my modem is going to be replaced tomorrow. Oh well. That means I can update more!

As you can see from my last Crackberry post.. I took a trip to Charleston on Friday! I had an appointment with my GI doc. Everything is going well. I have new meds, upping of old meds and a colonoscopy soon. I have to schedule that tomorrow. Uggh. No eating high on the hog that week! And of course, while I was in Charleston, I had to visit Knit and Andolini's!

I have been cooking up lots this past week! I have several new recipes to post this week and if you get lucky, maybe even TWO today! I made a FANTASTIC blueberry cobbler on the fourth of July and the recipe is so easy, peasy, that you can't not make one of these this summer!

A few posts ago, I posted a picture of a yummy Taco Pizza that I made. I got the recipe from The Pioneer Woman's blog. It is really easy to make and the results are fantastic! Sadly, I didn't take alot of pictures while I was making the pizza. You know. Camera drama and all. But I will post the recipe here and walk you through it step by step!

Now, here is the key to the pizza. The crust. I actually made my own crust and it was really easy to do. But, you may not have the time that I have or you may not have the patience. That is fine. You can buy a premade crust. No one will know! But if you have the time, make the crust. It is very good and makes two crusts. So if you like this pizza as much as me, then you will already have an extra crust ready to go in the freezer!

To make your own pizza crust you will need:
1 teaspoon of instant or active dry yeast (you can find this in the baking aisle)
1 1/2 cup of warm water
4 cups all purpose flour
1 teaspoon of salt
1/3 cup of olive oil

Start by adding the yeast to the warm water. Stir a tiny bit. Let it sit for about 15 minutes. While you are waiting, combine the flour and the salt. I just put it in my Kitchen Aid Mixer. Then slowly add your olive oil. Then add in your water/yeast mixture. Stir all together until you get a sticky lump.
Now here is the tricky part. This dough is better if you let it sit for a day in your fridge. I forgot about mine and it sat for 3 days. It was sooooo good!

When you are ready for the pizza, split the dough in half. Put the half you are not going to use in a Ziploc and put it in your freezer. Now, you are ready Freddy for the next time!

So, just let your dough hang out for now.

For the actual Taco Pizza you are going to need:
(Don't y'all miss my pictures??)
1 can of black beans  (14 ounces)
1 teaspoon of taco seasoning (I just bought an envelope and put the unused portion in a Ziploc)
1 cup grated Sharp Cheddar Cheese
1 cup grated Monterrey Jack Cheese
4 corn tortillas and 1/3 cup canola oil (if  you want to make your own tortilla strips. If not, add regular tortilla chips crushed.)
1 head of green lettuce, shredded (this is not iceberg lettuce, but the leafy green kind!)
2 whole red tomatoes, diced
Cilantro leaves
1/4 cup sour cream
3 teaspoons of hot sauce, your choice!

Preheat your oven to 500 degrees. Place your bottom rack on the lowest rung on your oven.

So, the first thing you want to do is dump your beans into a sauce pan. Put the burner on medium/low heat. Add in your one teaspoon of taco seasoning. Mix well and once the beans are warm, take a potato masher and mash the heck out of the beans. You want them to look like refried beans, but still be a little runny. When the beans are done, take them off of the burner and set aside.


Grab a cookie sheet. Drizzle a little bit of oil on the sheet. Then take your pizza dough and stretch it across the cookie sheet. Make it VERY thin! This pizza will be more of a rectangle than a circle. But the overall goal is a THIN crust. Once you have your crust spread out, then top with the beans. Then, sprinkle your cheeses over the beans. Place in the oven for 9-12 minutes, checking regularly to make sure your crust is not burning.

If you wish to make your own tortillas strips, now is the time! Cut your corn tortillas into VERY thin strips. I used my pizza cutter to cut through the tortillas. Put 1/3 cup of canola oil in a small skillet. Let it warm. Drop about a half of handful of strips in at a time. Let them fry for about 30 seconds, and then remove. Continue this until all strips are fried. As you remove the strips from the oil, place them on a paper plate with a paper towel to drain the excess oil. *If  you choose not to do this, I think that regular smooshed up tortilla chips would work fine too!

While the crust is baking, you want to dice up your tomatoes, and chop your lettuce. You will also want to wash the cilantro and cut off some of the stems. Also, at this point, mix up your sour cream at hot sauce. Put it into a Ziploc bag. Put this back in the fridge. This is a yummy way to top off your pizza!


When you pizza is finished, remove from the oven. Garnish with lettuce, tomatoes and cilantro. Add the tortilla strips. Next, take out your Ziploc baggie with the sour cream/hot sauce mix. Snip a little bit of off one of the corners of the bag. Drizzle over the entire pizza. YUM!!

***Now here's were I changed the recipe a little bit. I knew that I was not going to eat the entire pizza in one night. So I cut off of the squares I was going to eat and added the garnishes. I froze the rest. I also kept the leftover garnishes in a baggie in the fridge. That way, for the rest of the week, I could reheat the pizza and add everything else. Because y'all, to me, there is nothing worse than heated lettuce. It makes me ILL!!!

And, since I was having camera issues, I will show you what the finished pizza looks like. This is from The Pioneer Woman's website.

 And, here's mine!

This was a very yummy dinner. I also found out, that I really like cilantro. Who knew????!!

So I hope that you will enjoy this pizza as much as I did. In fact, I still have slices in the freezer! Just pop them out and heat for about 1 minute in the microwave. YUMMY IN THE TUMMY!

Hopefully I be back later on today with a Blueberry Cobbler recipe!
Tootles!
:) JKP

Wednesday, June 22, 2011

Barbecue Chicken Quesadillas.... Mmmm mmmm Good!

Hey Y'all!

Sorry for waiting until tonight to post this, today was busy! I had to take Miss Mitzi Mazda into the dealership for a recall issue today. I love my Mazda dealership. They have an awesome waiting area filled with every magazine you could ever want to read. And these are recent, not from 2008! They also have a TV! And since I was the only one waiting today, I got to indulge in all of the magazines I love to read, but don't subscribe to and watch The Young and the Restless! YAY! Most importantly, Miss Mitzi is ready to roll for our next upcoming road trip!

After I made it home from the dealership, Pitty Pat and I took a long afternoon nap. I am still recovering from my weekend of reunion fun. My stomach has been giving me a little fit over the past few days, so I declared this afternoon as couch potato afternoon. It was very nice! Also, couch potato afternoon has stretched into couch potato night!

Yesterday, using a leftover cup of Slow Cooker Barbecue Chicken, I made Barbecue Chicken Quesadillas.
OMG. They were yummy and only took about 15 minutes to make!

Here's what you will need:

4 cups of baby spinach
salt and pepper to taste
1 can of red kidney beans drained and rinsed
3/4 cup of corn kernels drained (if you use frozen, defrost and drain first)
1 cup Slow Cooker Barbecue Chicken (We made this in the last blog post!)
8 taco sized flour tortillas (I used burrito size and just cut them)
Cheddar Cheese
*You can also add 1/2 cup of red onion to this recipe when you saute the spinach. Onion hates my stomach, so I left it out. You can also add 1 tbsp of pickled jalapeno to this mixture. Imagine if my tummy hates onion, what it would do with jalapeno!

Start by drizzling some olive oil in a saute pan. When the pan is warm, place in the four cups of spinach.Saute until wilted. Add salt and pepper to taste and remove from heat. Also, at this time, place your oven on at 200 degrees.


While the spinach is resting, place the drained kidney beans in a bowl. Mash with a fork. Then add spinach, corn, and chicken. Mix all of the ingredients together well. *Add in the jalapeno pepper here if you would like to!
(* Note: I warmed the barbecue chicken for about a minute in the microwave before mixing it in with the other ingredients. I did not want to take a chance and make myself sick. I am sure it is fine if you don't, but with a stomach like mine, I am not willing to take the risk.)


At this point, I used a pizza cutter and sliced my tortillas in half. I placed about two tablespoons of the chicken/spinach/corn mixture on each slice. Then I topped it with a tablespoon of cheese. Then I folded each slice in half. I did this until I had a cookie sheet filled with baby quesadillas.


I had a little helper during this part. I think he was trying to hypnotize me!


Next, spray a pan with cooking spray and place on medium heat. When the pan is warm enough, place the quesadillas in the pan. Let each side cook for about 3 to 4 minutes. You want each quesadilla to brown on the outside just a bit. If they are browning too fast, cut down the heat on your burner.
As each batch of quesadillas finishes, place the quesadillas in the oven to stay warm.


ACTION SHOT! Pitty Pat got bored at this stage and started to chase his tail. BOYS!

Finished quesadillas in the oven.
Dab a little sour cream on a plate and ring the dinner bell!!!! YUMM-O!!

So as you can see, I am making the most of my summer break and cooking, A LOT! I will have one more recipe for y'all later on in the week, so don't throw those extra flour tortillas out. We are going to use them to make a casserole!

Let me run and get some shut eye! Big things are happening at Casa de Pitty Pat tomorrow and it involves paint, my front door and shutters. And don't worry, I am only directing this project, not doing it! 

Tootles!
:) JKP

Monday, December 8, 2008

Get In My Belly!

Hey Y'all!


Well, I kind of crashed and burned after Turkey Day. I think the classroom move just caught up with me! I also had some friends in town that I normally don't get to see, so I spent some of the Turkey Day holiday catching up with them. Also, one of my friends just had the most precious baby ever, so I had to go and visit!


Not to mention that I had a ton of things to catch up on, like grading papers, lesson plans, etc! I even took last Friday off just to chill. I really didn't get to chill... I had to have my mammogram re-done (everything is fine) and I had to take Mom out and about to do some errands. Saturday was pretty much the same (errands) and then yesterday Zoe, Zorro and I took it easy. I graded 10 sets of papers. So now, I can happily enjoy the upcoming holiday season! As you can see.. we are getting quite festive this year. I actually bought a live tree this year. I have never had a live tree in my house! This is my first! I always use an artificial tree. But, this year I really wanted a real one. Zoe and Zorro helped me decorate it Saturday night. And yes, that would be Paula Deen on TV. Yes, I decorate my Christmas Trees while the Food Network is on! I am classy like that!


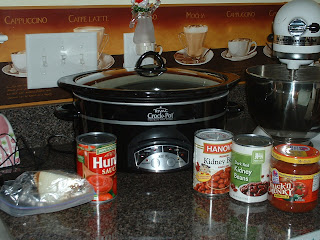
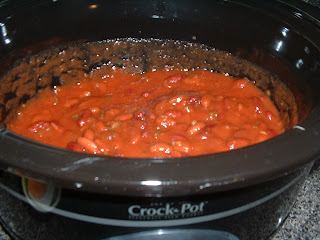
In other news, I have been cooking too! I found this really easy chili recipe on Kraft Foods and I have made it several times since. The nice thing is that you can put this in the crockpot and let it cook all day. You know me and my professed love for all things crockpot related. Below are the ingredients that you need to make "Julia's Get In My Belly Chili."
You will need 1 jar of Thick n' Chunky medium salsa by Taco Bell, I can of light kidney beans and 1 can of dark red kidney beans, 1 can of tomato sauce, a couple of sprinkles of chili powder, 1 onion and a pound of ground beef.
Combine beans, salsa and tomato sauce in crockpot. *Make sure you drain and rinse the beans first. Then use your handy, dandy food chopper and slice your onion into bits.


Take your onion bits and add them to your ground beef. Brown and then drain. Add to your other ingredients in your crockpot. Let cook on high for 6 hours or low for 8. Garnish with sour cream and cheese. Bake up some cornbread and you have your self some yummy in your tummy chili!


All this cooking wore the boys and girls out.


Finally, a pic with me and one of the cutest babies around. Of course, this one is human. This is me and baby Frank... Mama is my proud friend Kerri.... I say, "Job Well Done!" I went and visited on Saturday and Frank has already gained a pound since this photo Thanksgiving weekend and really doesn't look like this anymore. He is CUTER!!!


I am off to find a Christmas movie on TV and get some Christmas knitting done.....
:) JKP