Sunday, July 31, 2011

Bottoms Up!

Hey Y'all!
As you can see it's Martini Time!! NOT! I am just prepping for my colonoscopy tomorrow! I will update when I am awake! Think good thoughts for me. :)
Sent via BlackBerry by AT&T

Friday, July 29, 2011

Houston We are Back in Business!

Look what I just acquired! Pictures can resume!
Sent via BlackBerry by AT&T

Thursday, July 28, 2011

It's Coming to Life!!!!

Do you see what I see?
Sent via BlackBerry by AT&T

Something is Cooking on the Needles!

Stay tuned!
Sent via BlackBerry by AT&T

Wednesday, July 27, 2011

The Ice Cream Diaries... Part 1

Hey Y'all!

Well, I really wanted to get this posted earlier... but I couldn't take my messy, dusty house one more minute! After I came home from the beach this afternoon, I did laundry, cleaned baseboards and blinds, cleaned bathrooms and did some organizing. I feel so much better! Now I am free to craft tomorrow and not feel guilty about the state of my house! Sometimes you just have to take a moment and CLEAN!

One of the things that I have really enjoyed making this summer is ice cream! This is pretty unusual, because I am not a big ice cream eater. Out of all of the desserts I am least likely to pick ice cream. But when this stuff with my esophagus and tummy started, ice cream was the one thing that I could eat that made my chest and tummy stop hurting. So for now, ice cream and I are buddies!

A few Christmases ago, Mom gave me a Cuisinart Ice Cream Maker. I was excited when I received it, because besides ice cream you can make sorbet. Somehow or another, I just never got around to using it until this summer. Of course, me being me, I did all kinds of ice cream recipe research. When I went to make my first batch, I was really craving strawberries. Which is weird. I was very allergic to strawberries when I was little, but now I seem to be able to eat them just fine. So I found a great recipe on You Tube of all places! The bonus was that my exact ice cream maker was used in the video, so I didn't have to hunt for my elusive user's manual!


To make this ice cream you will need:
An electric ice cream maker with a freezer bowl (You want to make sure the freezer bowl has been pre-frozen for 8 to 12 hours)
2 cups of heavy cream
A teaspoon of vanilla extract
2 cups of fresh fruit mashed OR 16 to 19 oz of frozen sliced strawberries- thawed (I went with the frozen version because that is what they used in the original recipe)


Start by placing 2 cups of heavy cream in a bowl or large measuring cup. Add thawed or mashed strawberries. Here' s a quick tip... if you use the thawed sliced strawberries, go ahead and mash them a bit. That way large pieces won't get stuck in the ice cream paddle. Stir and then add 1 tsp of vanilla.


Turn on your ice cream maker and then slowly pour in the strawberry mixture.


Now let the machine do all of the work. Unload the dishwasher, put in a load of laundry. Go watch The Weather Channel. In about 25 minutes go back and check on the cream. It will be done!


Getting creamy!

When the ice cream is finished, fix yourself a bowl. It is soft serve at this point. You may prefer to put it in an air tight container for a few hours and then eat.


This ice cream is VERY creamy and yummy, but not overly sweet. If you like sweet strawberry ice cream, then I would add about a half a cup to a cup of sugar when you are mixing the cream and strawberries before you place it in the ice cream maker. I have another recipe that I am going to share tomorrow that has become my go to base for ice cream. And of course, if you like this... you can add other fruit too! I am sure y'all are just shocked that I didn't make this with blueberries! :)

Overall, this was a great first try with ice cream in my ice cream maker. Tomorrow... I will post my favorite recipe so far... Mint Chocolate Chip!!!!

Enjoy!!!
:) JKP

TOES IN THE SAND!

Hey Y'all!
Well the monsoon over Myrtle Beach has taken a break! Three guesses where I am? I'll be back with a blog post later! Today we start The Ice Cream Diaries! Yum, Yum!
Sent via BlackBerry by AT&T

Monday, July 25, 2011

So, Sew Busy!!

Hey Y'all!

Well. It is HOT. Since it is too hot to go to the beach, too hot to cook, and too hot to knit, I have had to find other ways to entertain myself! Many of you may not know this, but about 7 years ago, Mom and I had a business sewing purses. We went to several craft fairs, had trunk shows, and took lots of orders. During that time I also took a sewing class to really learn the basics. Mom and I kind of let the business go when I took a job in the Healthcare IT field. But, we both still sewed on and off. We also have a huge stash of fabric. I haven't really sewed in about 5 years. Over the fourth of July weekend, I decided to crank up my sewing machine.  My first few projects were rusty, but I was amazed that I remembered how to thread my machine and sew all kinds of stuff! This week, I got brave and picked up a couple of 99 cent patterns at the Evil Empire. Unfortunately, we don't have a store in Myrtle Beach that sells fabric for sewing garments. I have to drive to Florence or Charleston to visit a Hancock Fabrics and the nearest Joann's is in Wilmington. Uggh! So. I have to settle for the Evil Empire at the moment. Anyhoo, armed with my patterns and a fabric stash at home, I decided that aprons were just the ticket to get my feet back into sewing!

My first apron pattern I actually found on clearance. It was printed on fabric and all you had to do was cut out the pieces and sew them together. This took me about 3 hours. Not that it should have! I just really took my time. I also just LOVE the cupcake theme! And, let me apologize for the quality of the pics. I had to take them with my Blackberry. The camera battery is still dead.


Can you spot the Pitty Pat?

Next up on the sewing palooza was a challenge for me. It looked easy on the package! Famous last words! I had to put in pleats and add bric brack. Two things that I have never done before. Also, you had to add an under skirt to this with a contrasting fabric. This turned out alot better than I thought it would. The pockets are a little wonky... but my feeling is.. if it resembles the picture on the pattern package, then it was a job well done! I plan on making another one of these tomorrow now that I know how the pattern works. WARNING: OBJECTS IN MIRROR APPEAR LARGER THAN THEY REALLY ARE! I swear this apron adds about 15 pounds in the picture!


My last apron is my favorite. The pattern was a dream and from cutting out the pattern, fabric and sewing it only took me an hour and a half. Now that I know the pattern, it will be easy to pop out. The cool thing about this apron is that it is... wait for it...... REVERSIBLE!!!! OH SNAP!!! I did this with with a coffee fabric since the border in my kitchen is a coffee border. I love, love, love this!

  Hmmm... and two become one! Marie, if you are reading this, I have turned your room into my cutting and ironing room! Come visit soon! :)


I don't think you can tell from the pictures, but I used a contrasting fabric on the apron front and the pockets. This is so cute. I can't wait to make another one tomorrow!

Last but not least, I got a wild hair tonight and sewed up a sewing machine cover for my sewing machine. Again this is from stash fabric and took about 15 minutes to make. I didn't have a pattern for this. This is just a rectangle with ribbon. I did a different fabric on each side, so I can switch it up! I found this idea on the Internet.


I have several more sewing ideas up my sleeve! Tomorrow we have a 60  percent chance of rain, so I am sure that I will be sewing again. The Internet is a great place to get free sewing ideas. I have decided that I am going to master a pattern for a Nook. All of my friends have them and it would make a great gift! Also up on the sewing agenda is repairing a second hand Vera Bradley purse and making a spa wrap out of a towel. I can't wait!

My Mama is obsessed. As long as she doesn't start sewing me "outfits" we are good!

I am trying to convince my Mom that after my colonoscopy next Monday in Charleston, I will be good to go to Hancock Fabrics. She doesn't quite believe me! :)

Tootles!
:) JKP

Sunday, July 24, 2011

Summer is Slipping Away...

Hey Y'all!

Well, I made it through my workshop last week! It was so productive and wonderful. I got so many activities completed that I am ready for my first two units of reading in September. The only down side to the whole workshop was an announcement. Our school board altered our calendar and now we have to be back at work August 11th. Which is three workdays earlier than planned. It's ok. In my school district we go back 3 days early for staff development. We get paid for these extra three days. So it's not so bad. I am just not ready to give up my summer yet! Especially since I haven't been feeling the best these past few weeks. I am excited to meet my new children, but I am so not ready for all of the work DRAMA and stress. Where are my ruby slippers when I need them!

My GERD/Crohn's has calmed down a bit. It took about 4 days for my insurance company to agree to pay for the double dosage of Nexium to help with my painful reflux and swallowing. I have been double dosing for about a 4 days now and I can sleep at night. I still can't eat very large meals and my upper tummy feels bloated all of the time, but I am doing better. Next Monday, Aug. 1, I am having a colonoscopy. Which means this time NEXT Sunday will not be fun for me. I get to go pick up my wonderful colonoscopy prep in the morning after I tutor. The colonoscopy is just routine. It has been 3 years since my last one and my GI doc thinks it is time he takes a look. WHATEVER. As long as he gives me the magic medicine and I sleep through the whole thing! And, also hide my debit card. I likey the shopy when I am on pain meds! :)

I don't know about y'all, but it has been TERRIBLY hot here. It is too hot to cook. Not that I want to, I really can't eat anything! It is to hot to pick up the needles and knit. It's too hot to go to the beach. Poor Pitty Pat is only getting 2 walks a day and I have to get up extra early to get the first one in before we cook on the sidewalk. So we have been hanging out, watching movies, going to movies and reading. I may have been making ice cream in my ice cream maker. Also, there has been some crafting of the sewing type! I will post pics tomorrow. My camera officially died. So I am going to have to see if I can resurrect my old camera to take some pics of what I have been sewing and making in the ice cream maker. I have amazed myself!

Today I went and checked out Captain America. It was very good and reminded me of the early Indiana Jones movies. I also checked out the last Harry Potter movie a few days ago. It was very good, if somewhat dark. I *might* have even cried at the end, even though I knew how it ended!

Well let me run, it has stopped raining! Pitty Pat wants a walk and since it has calmed down to a balmy 73 degrees, I think we have to seize this opportunity!

Tootles!
:) JKP

Tuesday, July 19, 2011

The Sunday Plate- Slow Cooker Mouth Watering Pot Roast

Hey  Y'all!

This week I am a busy bee! I am attending a workshop that our school district is offering for K-3 teachers. Luckily, it is at the school right across the street from my house! This workshop has been wonderful! The way we teach reading in our school district is through a phonics and a basal reader approach. We do whole group instruction with phonics and read a story from a basal. After our morning lesson, which is about 45 minutes, we move to small group instruction. While we are working with small groups, the other students are working in workstations. This is a BIG deal in my school district. We have a certain way and expectations on how we are to make these centers. It has been very expensive for teachers to make these workstations. So this workshop is such a blessing! The school district is giving us the materials we need to make these work stations. When we arrived this morning we had lessons already printed out on cardstock and laminated! All we  had to do was cut and place these in folders. When we finished that, we were given more materials we could laminate and get ready. Tomorrow and Thursday we get to to more of the same. I am so excited because after this workshop I will be ready for all of my workstations in August! YAY!

 And p.s. I am feeling a little bit better! I got to sleep all night last night and I have been able to eat breakfast and lunch today. I think things are starting to kick in and the herbal tea is REALLY helping. I am able to swallow alot better now. Things don't seem to be getting as stuck and I can actually take a deep breath now! Keep your fingers crossed! I have even had to go to granny nightgowns. Not. Cool. Especially when you have to walk a dog at 6:00!!!!! My pj's were hurting my stomach. So the sooner this episode ends, THE BETTER!

Now, ON TO THE SUNDAY PLATE!

Y'all. I promise this is one of the best things I have ever made in my crockpot. Well, Mom's crockpot. I made it this weekend while I was visiting. This pot roast turned out so tender, that even I, in my problem swallowing condition could eat it! YUM!!!!

Here's what you will need: (Sorry, no ingredients pic.. I was in Mom's kitchen and it threw me off!)
1 can of cream of mushroom soup (you can use regular, 98% fat free and Healthy Choice. I used regular. And that is why my cholesterol is a number we shall not name.)
1 pouch of dry onion soup recipe mix
6 small red potatoes, halved (You do NOT need to peel the potatoes.)
6 medium carrots cut into 2 inch pieces (I cheated and bought baby carrots in a bag. They worked great!)
1 3 (three)  lb boneless beef bottom round roast or chuck pot roast

Start by mixing together the cream of mushroom soup and the onion soup mix packet. Stir well.


Rinse and drain your potatoes and carrots. (This was Mom's job!)


Next, add your potatoes and carrots into the slow cooker. Mix well with cream of mushroom soup and onion soup.


Then add  your meat. Make sure that you completely coat both sides of the roast with the soup mixture.

Finally, put on your lid and start cooking! Now you can cook this on low for 8 to 9 hours, or until the roast is tender when you touch it with a fork. If you are impatient like me, turn the sucker on high and let the roast cook for 4 to 5 hours. But beware, the smell will make your mouth water!

Now, kick back and get ready for the compliments. Because y'all.... this is a company dish! Enjoy!


Tootles!
:) JKP

Sunday, July 17, 2011

Out of This World Iced Coffee

Hey Y'all!

Sorry for the mini break, but I have been battling some Crohn's related issues! I haven't really been able to eat! So. Not. Fun. About 15 years ago, I found out that not only do I have Crohn's in my intestines, but I also have it in my esophagus along with a horrible case of GERD. Sometimes my reflux and Crohn's don't play well together, which is happening right now. It is hard for me to swallow and things like to get stuck in my windpipe. Anything that I eat causes horrible heartburn. So, I am eating soft warm things. I can't have sweet tea at the moment, because it aggravates everything. I found this wonderful Heartburn Soother Tea at Earth Fare and that has helped A LOT. I am hoping this passes soon. I can't sleep at night between the reflux and the heartburn. I am on Nexium TWICE a day so hopefully it will help soon. I am also taking the Motillium to help my food keep moving! So kep those fingers crossed!!

One thing I can still drink, believe it or not is coffee! Crohn's patients are not advised to drink coffee. I am the .6784 percent that it helps. Earlier this summer I hunted down recipe after recipe on the Internet to make iced coffee. Folks, iced coffee, well good iced coffee, is not simply making coffee in your coffee maker and then putting it in the fridge to cool! Through my research, I found that a cold brew method is the best way to make iced coffee. And the results are very yummy. So yummy in fact, that I no longer spend $4 at Starbucks to get an iced coffee, I make my own! The nice thing about this is that when I make a batch, it literally lasts for weeks. As long as you have room in your fridge for a container to hold your coffee.. you are golden!

To start out with,  you want to make sure you have a strong coffee. I LOVE Cafe Bustelo coffee, because it is more espresso than coffee. And, I LOVE strong coffee/espresso! You will also need a measuring cup for 1/4 of a cup and 1 cup. Next you will need a container, you can use a gallon or less. Just make sure it will hold all of your water when you finish your recipe!


Here's the formula for making this iced coffee. For every 1/4 cup of coffee grinds you add to your container, you want to add a cup of water. So, for me, I added just about 2 cups of coffee grinds into my container. So, I needed to add 6 cups of cold water. Make sure you add all of your coffee grinds FIRST, then add your water and stir. If you need to make tallies as you add your 1/4 cup of grinds so you can remember how many cups of water to add, that's good too!


After you have added all of the grinds that you want and all of the water, cover your container. I have these neat shower cap looking gadgets that I picked up at Dollar General. They are perfect for this! You want to let this concoction sit for 8 to 12 hours. It will resemble mud. Do not eat it! Do not make mudpies! Warn anyone in your family not to drink this!


While my coffee is marinating.. hee, hee, I make a simple sugar syrup sauce to add to my coffee each day. Trust me, the syrup is easy to make, and you get to avoid the grittiness of adding actual sugar to your coffee. You can store this in the fridge when you are done.

In a saucepan combine 1 cup of sugar and 1 cup of water. In this case I added 2 cups of sugar and 2 cups of water so it would last longer. Bring to a boil, stir and remove from the burner. You can tell when the sugar and water are combined, the syrup will be clear. When the syrup has cooled, you can place it in a container for easy use. Don't judge. I have a left over mustard container that I put my syrup in. I am not a mustard fan!!


Now, once your 8 to 12 hours has passed, it is time to make the coffee! Now this part is tricky, so don't do this when you first wake up! We don't want coffee grounds in our coffee liquid. So you need to strain the coffee liquid to separate the grounds. Just using a strainer is not enough. You can use a coffee filter or a paper towel to do this. I take a piece of cheese cloth (you can get this at The Evil Empire, Target, and any cooking store) and cover the container lid and secure it with a rubber band. Or, if you are ghetto like I was when I made this batch, use your plastic from your cover! Then I drain the coffee liquid into another container. It make take a minute or two, but you want to get out all of that rich coffee goodness. You can throw away the grinds when you are done.


We are almost there!!! Now, you need to add more water to dilute the coffee just a bit. I mean, I LOVE some strong coffee, but y'all this is just a bit much! Remember how many cups of water you added after you placed your coffee grounds in your container? That's how many MORE cups of water you are going to add to dilute your coffee. I added 6 cups. So I will add 6 more cups of water to my liquid coffee. At this point, I wash out my container that has been cold brewing my coffee overnight. This is what I put my final product in!


Now, grab a glass, put some ice cubes in it, grab your simple syrup, some milk and some caramel sauce if you like.

Fill your class a little less than 1/2 full with coffee. Squirt in some simple syrup. Add some caramel. Mix. Then add milk to the top of your glass. Mix. Grab a straw. Plunk yourself on the sofa. Sip! Welcome to Heaven!!!

You can tinker with how much simple syrup (if any), milk, caramel that you add. You can even use half and half. Or skim milk. You can also take ice cube trays and fill them with some of your liquid coffee to extend your iced coffee experience.

You can place your container with your coffee in your fridge. It will last for up to a month. It's even better the second day when it is COLD.

Enjoy!!
:) JKP

Monday, July 11, 2011

I Pledge Allegiance To Blueberry Cobbler.........

Hey Y'all!

I have a serious weakness in the summer. No. It is not sweet tea, knitting, painting my toenails, watching summer TV, roadtrips or sitting on a beach. Wait. Maybe it is! Well, let's add one more item to that list! BLUEBERRIES. Everywhere I go in the summer, if they sell blueberries, I have to buy them. I love to munch on blueberries throughout the day, put them on my cereal, and add them to my ice cream. But, I also LOVE to bake with them too! And on the 4th of July (one of my FAVORITE holidays, besides Halloween) I was faced with a blueberry coup. They were taking over my fridge. I knew I needed to fight back, and a cobbler was just the ticket!

First, you need to preheat your oven to 350 degrees.

Then you need to rinse two cups of blueberries. Pick off any stems that are left on the berries. Drain them and dry them. Place them in a mixing bowl and then add about 1 tablespoon of cornstarch. After that, add 1/2 cup of sugar. You can add more if you feel your berries aren't sweet enough, but 1/2 cup of sugar is alot for me! Next, add a teaspoon of vanilla extract. Mix all of these items together and then let the berries hang out for a while.


In a bowl or food processor add one cup of all purpose flour, 1/4 cup of sugar, 1/4 cup of brown sugar, 1/3 cup of oats (oatmeal... I used slow cooking oats, but use what you have on hand), a pinch of salt and 3/4 ths of a stick of butter sliced into pieces. Mix the first few ingredients together, then add the butter slices. Using a fork and a knife, cut in the butter with the rest of your ingredients. If you have a pastry cutter, you can use that too. Also, if you have a food processor you can mix this together in that. I have one, I was just too lazy to haul it out. Your object is to have the "crumble" resemble sand with tiny pebbles.

Add the blueberries into a pie plate or baking dish. Add the topping on top of the berries. Bake for 25 to 30 minutes until the top is golden brown and the berries are bubbly.

Before the oven.....

AFTER!!!

You can spoon this out onto plates and serve it warm with your favorite ice cream or whipped cream. It is HEAVEN ON EARTH!


Also, this is a generic cobbler recipe. You can add any fruit and this will work. I am just obsessed with blueberries at the moment. Mmmmmm.... mmmmm... good! Enjoy!!!!!!!!!!!!!!!!!!!!!!!!!!!!!!!!!!!!

Tootles!
JKP

Sunday, July 10, 2011

Taquito Pizza!

Hey Y'all!

Well!! The Internet drama continues at my house! The crazy thing is that it works just FINE on the WEEKENDS! But when Monday morning rolls around... we are back to one hour of Internet equals three hours of no Internet. So, sadly I think my modem is going to be replaced tomorrow. Oh well. That means I can update more!

As you can see from my last Crackberry post.. I took a trip to Charleston on Friday! I had an appointment with my GI doc. Everything is going well. I have new meds, upping of old meds and a colonoscopy soon. I have to schedule that tomorrow. Uggh. No eating high on the hog that week! And of course, while I was in Charleston, I had to visit Knit and Andolini's!

I have been cooking up lots this past week! I have several new recipes to post this week and if you get lucky, maybe even TWO today! I made a FANTASTIC blueberry cobbler on the fourth of July and the recipe is so easy, peasy, that you can't not make one of these this summer!

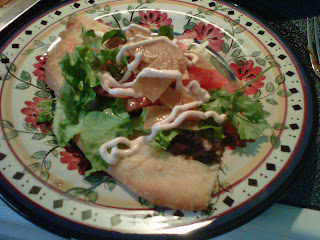
A few posts ago, I posted a picture of a yummy Taco Pizza that I made. I got the recipe from The Pioneer Woman's blog. It is really easy to make and the results are fantastic! Sadly, I didn't take alot of pictures while I was making the pizza. You know. Camera drama and all. But I will post the recipe here and walk you through it step by step!

Now, here is the key to the pizza. The crust. I actually made my own crust and it was really easy to do. But, you may not have the time that I have or you may not have the patience. That is fine. You can buy a premade crust. No one will know! But if you have the time, make the crust. It is very good and makes two crusts. So if you like this pizza as much as me, then you will already have an extra crust ready to go in the freezer!

To make your own pizza crust you will need:
1 teaspoon of instant or active dry yeast (you can find this in the baking aisle)
1 1/2 cup of warm water
4 cups all purpose flour
1 teaspoon of salt
1/3 cup of olive oil

Start by adding the yeast to the warm water. Stir a tiny bit. Let it sit for about 15 minutes. While you are waiting, combine the flour and the salt. I just put it in my Kitchen Aid Mixer. Then slowly add your olive oil. Then add in your water/yeast mixture. Stir all together until you get a sticky lump.
Now here is the tricky part. This dough is better if you let it sit for a day in your fridge. I forgot about mine and it sat for 3 days. It was sooooo good!

When you are ready for the pizza, split the dough in half. Put the half you are not going to use in a Ziploc and put it in your freezer. Now, you are ready Freddy for the next time!

So, just let your dough hang out for now.

For the actual Taco Pizza you are going to need:
(Don't y'all miss my pictures??)
1 can of black beans  (14 ounces)
1 teaspoon of taco seasoning (I just bought an envelope and put the unused portion in a Ziploc)
1 cup grated Sharp Cheddar Cheese
1 cup grated Monterrey Jack Cheese
4 corn tortillas and 1/3 cup canola oil (if  you want to make your own tortilla strips. If not, add regular tortilla chips crushed.)
1 head of green lettuce, shredded (this is not iceberg lettuce, but the leafy green kind!)
2 whole red tomatoes, diced
Cilantro leaves
1/4 cup sour cream
3 teaspoons of hot sauce, your choice!

Preheat your oven to 500 degrees. Place your bottom rack on the lowest rung on your oven.

So, the first thing you want to do is dump your beans into a sauce pan. Put the burner on medium/low heat. Add in your one teaspoon of taco seasoning. Mix well and once the beans are warm, take a potato masher and mash the heck out of the beans. You want them to look like refried beans, but still be a little runny. When the beans are done, take them off of the burner and set aside.


Grab a cookie sheet. Drizzle a little bit of oil on the sheet. Then take your pizza dough and stretch it across the cookie sheet. Make it VERY thin! This pizza will be more of a rectangle than a circle. But the overall goal is a THIN crust. Once you have your crust spread out, then top with the beans. Then, sprinkle your cheeses over the beans. Place in the oven for 9-12 minutes, checking regularly to make sure your crust is not burning.

If you wish to make your own tortillas strips, now is the time! Cut your corn tortillas into VERY thin strips. I used my pizza cutter to cut through the tortillas. Put 1/3 cup of canola oil in a small skillet. Let it warm. Drop about a half of handful of strips in at a time. Let them fry for about 30 seconds, and then remove. Continue this until all strips are fried. As you remove the strips from the oil, place them on a paper plate with a paper towel to drain the excess oil. *If  you choose not to do this, I think that regular smooshed up tortilla chips would work fine too!

While the crust is baking, you want to dice up your tomatoes, and chop your lettuce. You will also want to wash the cilantro and cut off some of the stems. Also, at this point, mix up your sour cream at hot sauce. Put it into a Ziploc bag. Put this back in the fridge. This is a yummy way to top off your pizza!


When you pizza is finished, remove from the oven. Garnish with lettuce, tomatoes and cilantro. Add the tortilla strips. Next, take out your Ziploc baggie with the sour cream/hot sauce mix. Snip a little bit of off one of the corners of the bag. Drizzle over the entire pizza. YUM!!

***Now here's were I changed the recipe a little bit. I knew that I was not going to eat the entire pizza in one night. So I cut off of the squares I was going to eat and added the garnishes. I froze the rest. I also kept the leftover garnishes in a baggie in the fridge. That way, for the rest of the week, I could reheat the pizza and add everything else. Because y'all, to me, there is nothing worse than heated lettuce. It makes me ILL!!!

And, since I was having camera issues, I will show you what the finished pizza looks like. This is from The Pioneer Woman's website.

 And, here's mine!

This was a very yummy dinner. I also found out, that I really like cilantro. Who knew????!!

So I hope that you will enjoy this pizza as much as I did. In fact, I still have slices in the freezer! Just pop them out and heat for about 1 minute in the microwave. YUMMY IN THE TUMMY!

Hopefully I be back later on today with a Blueberry Cobbler recipe!
Tootles!
:) JKP

Friday, July 8, 2011

Friday Fun!

Can you guess where I am eating lunch today? I am in my happy place!!!
Sent via BlackBerry by AT&T

Tuesday, July 5, 2011

Summer Movie Fun!

Hey Y'all and Happy July!

I have been having all kinds of fun since I last posted on the blog. It suddenly hit me last week, that I was on summer vacation! I know! I have only been out of school for a month! :) I have been cooking, reading, going to the movies and hanging out with friends. It has been so nice!

Sorry I haven't had a "real" post in a while. I have been having some issues with the Internet at my house. It works one minute, the next it doesn't work for two hours. So sometimes, it is just easier to send pics and updates from the crackberry. The cable company and I are in all sorts of cahoots to figure out what is going on. It has been a fun adventure. Luckily I have a great cable company that actually provides you with someone to talk to when you call. And. They are not in India! Also. My poor camera. My camera cord that I use to download pics and to charge the camera broke right after my reunion. I bought a SD card reader to get the pictures off of my camera, but now I am faced with how to charge the thing! I refuse to pay $35 to Kodak for a cord. So I have found a charger on Amazon. But, this is a very expensive month for me. Pitty Pat needs to go to the groomer and to the vet for his yearly checkup. So, the charger will have to wait until the end of the month. Be patient! :)

Also, as you may have seen from the last post, Myrtle Beach is kind of on fire again. We are battling a large wildfire about 15 miles from my house. The scary thing is we can see the smoke. YIKES! It has burned over 750 acres as of today and it is still growing. But, luckily as of now, it is away from any people and houses. This heat and wind and lack of rain that we are having are not helping matters at all!

And as y'all know, one of my favorite things to do in the summer is go to the movies! Last week I checked out Mr. Popper's Penguins with a few of my students from this past year. The movie was very cute. Although, let me warn you, if you read the book, it is entirely different. They have modernized the story a bit. But, Jim Carey was fantastic!

Of course, I had to check out Transformers 3- Dark Side of the Moon. Yup. I am a total action adventure junkie/fan. If you throw in a conspiracy or two about the moon and space program... I am so there!  It was what you could typically expect from Michael Bay. Lots of stuff blowing up. Aliens. But the story line was good. But beware, you may lose some hearing from this movie!

I finally got to see Super 8 this past weekend. Any movie that has the combined forces of J.J. Abrams and Steven Spielberg has to be great. It was! Since it was set in 1978 there were lots of things that reminded me of my childhood. The coffee table, sofa and chair my parents had in avocado green in our living room was actually in the movie. The movie itself was very entertaining. In some parts it did feel like E.T. Go see this just for the thrills and to enjoy a movie the way it should be!

I am also looking forward to the final release of Harry Potter! That is next week. Although, I usually like to wait until the crowd dies down a little. I hate having somebody next to me literally sitting in my lap!

And, I would just like to thank my students for movie gift cards for my end of the year prezzies. I still have a ton left on the cards, so there will be many more movies to see this summer! :)

I have been cooking away too! Evidenced by the fact that when I stepped on the scale this morning I found out I have gained TWO pounds! Now, that is not a lot for most folks, but when you are short, it might as well be 15! So, I have to start my walking back up. Or rolling as it probably is now! The way I look at it is, at least I am cooking and not eating frozen meals all the time. And really, I am feeling a lot better by cooking and not eating prepared meals. That was my goal for the summer. To cook more, fill up my freezer and stay away from frozen dinners. My stomach is happier, I can tell you that!

Well, let me roll. Ha, Ha! It is time for Pitty Pat's supper.
Tootles!
:) JKP

Monday, July 4, 2011

More Pics

Here's one more... This is taken from the elementary school that I live near.
Sent via BlackBerry by AT&T

Wildfire!!!

Hey Y'all,
Myrtle Beach is battling yet another wildfire. Here are some pics as seen from my neighborhood. It is about 10 miles from me.


Sent via BlackBerry by AT&T

Friday, July 1, 2011

What's Cooking at Julia's!

Hey Y'all!
Just a quick stop to show you what's for dinner tonight! Taco Pizza. And trust me... It is GOOD! I'll post a link to the recipe tomorrow! Happy July y'all!
Sent via BlackBerry by AT&T