
 To make your own Easter Bunny Cake you will need the following:
 When the cake is done, let it cool for at least an hour. You have some cutting and arranging to do. The cooler the cake, the better it holds up. One of the cakes is just for the face. The other one you will score with two half moon shapes. This makes up the bunny's bow tie and ears. While the cakes are cooling, take a large cookie sheet and cover it in tin foil. Then place one whole cake on the cookie sheet.

Then score the second cake like I have below. It's okay if it is not perfect, you are going to cover it in icing and coconut anyway!

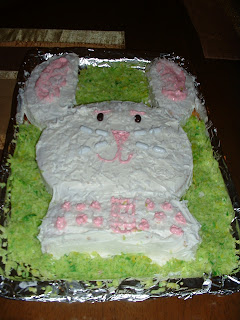
Assemble the pieces together on the cookie sheet. Then begin to ice the cake in icing. This is fun!


The next part is where you really get to be creative! I use food coloring and some more frosting and tint it pink. I use this for the inside of the ears. Every year I change the candy that I use. Some years I use licorice for the whiskers, this year I used Good n' Plenty for a change. I use jelly beans for the eyes. This year I free handed the nose and mouth. All you have to do is put some icing in a Ziploc bag and snip a little bit off a corner. It works well in a pinch if you don't have a pastry bag to pipe icing.


For the last part, I sprinkle coconut all over the little guy. I don't add alot, I am not a big coconut fan. I also put a little bit of coconut in a Ziploc with some green food coloring. This makes the "grass" that surrounds the bunny. I add a little yellow to it as well. I like for my "grass" to be neon!


That's all there is to it! Don't worry if it's not perfect, the coconut and icing will hide any flaws!
I am off to finish some knitting and to watch Slumdog Millionaire....
Toodles!
:) JKP
No comments:
Post a Comment